Thursday, March 6, 2014
Big and small projects


Wednesday, March 5, 2014
Make a Heart in a heart picture frame Aww
It would make a nice gift for that special lady in your life. Or even your wife!
If you would like to make your own, here is my design template of the Heart-in-a-heart picture frame.
Using A Wood Router
Using a wood router to shape an edge, plow a dado, or perform some other cutting task is an important requirement of many woodworking projects that youll come across. Even a project as simple as the toy blocks can be greatly enhanced by employing a wood router to soften the edges with a roundover bit.
If youre completely new to woodworking, or even just new to wood routers, this series of videos should prove to be very useful to you. Woodworking routers are dangerous tools, and operating them with good results can be a mysterious endeavor.
Although there are numerous online videos that demonstrate great tips on using wood routers, most of them are targeted more towards people who already have a basic knowledge of router operation.
This series of videos takes a slightly different approach. The videos teach the very basics of operating a router, including a strong emphasis on safety. Theyre produced by an industrial arts instructor so its just like being in shop class!
Return from Using A Wood Router
to Woodworking Videos
Click Here and Start WoodWorking
Sorry Shannon
Fine Woodworking near you Come out and see us
Find out where Fine Woodworking contributors (like Steve Latta seen here) are teaching or attending events
Photo: Steve Scott
Take a class or attend an event with one of Fine Woodworkings contributors.
Christian Becksvoort
June 11, 2011: Dovetail Workshop
Sabbathday Lake Shaker Village - Maine
June 18, 2011: Drawer Workshop
Sabbathday Lake Shaker Village - Maine
June 20-24, 2011: Shaker Furniture
The Carpenters Boat Shop - Maine
July 9-10, 2011: Hand Tool Skills
Lie-Nielsen - Maine
July 23, 2011: Build a Shaker Bench
Sabbathday Lake Shaker village - Maine
July 29-31, 2011: Craft Show
Mount Deset Island 36th Annual Directions Show - Maine
Oct 7-10, 2011: Scrapwood into Stars
Haystack Mountain School of Crafts - Maine
Michael Fortune
May 31-June 10, 2011: Apprenticeship
Marc Adams School of Woodworking - Indiana
June 5, 2011: Getting the Most From Your Bandsaw
Marc Adams School of Woodworking - Indiana
June 24 - 28, 2011: Working With Curves
Peters Valley Craft Center - New Jersey
Aug 8-12, 2011: Chair Design
The Northwest Woodworking Studio - Oregon
Aug 20-21, 2011: Doing Curved Joinery
Marc Adams School of Woodworking - Indiana
Aug 22-26, 2011: Table of Contents
Marc Adams School of Woodworking - Indiana
Sept 19-23, 2011: Designing Chairs
Marc Adams School of Woodworking - Indiana
Sept 24-25, 2011: Embellish Your Work
Marc Adams School of Woodworking - Indiana
Oct 15, 2011: Making a Living as an Artist, Designer, & Furnituremaker
Marc Adams School of Woodworking - Indiana
Oct 16, 2011: Drawing in Perspective
Marc Adams School of Woodworking - Indiana
Oct 17-21, 2011: Making a Bow-Front Chest
Marc Adams School of Woodworking - Indiana
Oct 22-23, 2011: Making the Ultimate Gift
Marc Adams School of Woodworking - Indiana
Peter Gedrys
Chris Gochnour
June 13-17, 2011: Making a Curved Front Night Stand
Marc Adams School of Woodworking - Indiana
Garrett Hack
July 15-16, 2011: 30th Anniversary Open House
Lie-Nielsen - Maine
Aug 1-5, 2011: Precision with Hand Tools
Center for Furniture Craftsmanship - Maine
Aug 6-7, 2011: Furniture Details: Decorative Edges and Faces
Lie-Nielsen - Maine
Sept 12-16: Build a Side Table
Port Townsend School of Woodworking - Washington
Sept 19-21, 2011: Precison with Hand Tools
Port Townsend School of Woodworking - Washington
Oct 3-9, 2011: Make an Occasional Table with Exquisite Details
West Dean College - West Sussex, England
Roland Johnson
Sept 19-23, 2011: Finishes & Finishing
The Northwest Woodworking Studio - Oregon
Matt Kenney
July 29-Aug 2, 2011: Make a Box with Hand Tools
Peters Valley Craft Center - New Jersey
Tim Killen
July 23, 2011: SketchUP
AWFS - Nevada
Steve Latta
July 18-24, 2011: Making a Spice Box
Marc Adams School of Woodworking - Indiana
July 16-17, 2011: Pattern Inlay and Decorative Borders
Marc Adams School of Woodworking - Indiana
Aug 27-28, 2011: Build a Federal Sideboard, part I
Olde Mill Cabinet Shoppe - Pennsylvania
Oct 8-9, 2011: Build a Federal Sideboard, part II
Olde Mill Cabinet Shoppe - Pennsylvania
Dec 17-19, 2011: Build a Federal Sideboard, part III
Olde Mill Cabinet Shoppe - Pennsylvania
Philip Lowe
Ongoing Classes
Furniture Institutue of Massachusetts
June 18-19, 2011: Hand Cut Dovetails
Lie-Nielsen - Maine
July 25-29, 2011: Sheraton Tilt Top Table
The Northwest Woodworking Studio - Oregon
Teri Masaschi
Aug 29-Sept 9, 2011: Finishing From A to Z
Center for Furniture Craftsmanship - Maine
Sept 12-16, 2011: Hand Applied Finishes
Center for Furniture Craftsmanshop - Maine
Oct 3-7, 2011: Basic Finishing
Kelly Mehlers School of Woodworking - Kentucky
Jeff Miller
Ongoing Classes
J. Miller Handcraftred Furniture - Illinois
July 20-21, 2011: Chairs: Curves and Joinery by Hand
AWFS - Nevada
July 30-31, 2011: Mortise and Tenons: Hand Cut Joinery Made Easy
Lie-Nielsen - Maine
Gregory Paolini
Ongoing Classes
Gregory Paolini Design - North Carolina
June 4, 2011: Hands on Finishing
The Woodworking Source - North Carolina
Michael Pekovich
July 20-23, 2011: Photographing Your Work
AWFS Fair 2011 - Nevada
Aug 19-23, 2011: Dovetails: Intro to Working with Hand Tools
Peters Valley Craft Center - New Jersey
Doug Stowe
June 15-19, 2011: Box Making
Kansas City Woodworkers Guild - Missouri
July 25-29, 2011: Creative Box Making
Eureka Springs School of the Arts - Arkansas
Aug 8-13, 2011: Simply Beautiful Boxes
Marc Admas School of Woodworking - Indiana
Aug 13, 2011: Interior Architecture for Boxes
Marc Adams School of Woodworking - Indiana
Oct 29-30, 2011: Box Making
Sawdust & Woodchips Woodworking Association - New York
Click Here and Start WoodWorking
Another plane collection
They have not been inherited as I come from a long line of geeks; all I got was a stack of computer punch cards. I have gathered the planes over less than 2 years, which is just about as long as I have been interested in woodworking. I took some photos of the warzone to give some perspective. Then I placed the planes on item #1 from my honey-do list (11/4 thick walnut bench) and took somes shots. For reference, the walnut piece is exactly 12" wide. I promise I did tidy up the place before I took the shots and I chose the best available angle.
My current interest is building stave shell drums. I am slowly getting there. In the mean time, I am developing a huge interest in hand tools. Next on my list is a Roubo workbench, braces, more drawknives, a beam drill, and a few more drawbore pins.


Tuesday, March 4, 2014
Coping saw jig

He then posed the question: "How can I cut straight lines using a coping saw?"
Well Tim Sluder actually has a coping saw jig! This is pretty cool. If you like, heres a PDF version.
Here are his instructions:
The jig, works best when clamped in a vice or screwed to awork bench. Coping is a two-handed operation that iswhere this jig helps. You have to keep turning your workback and forth to get a straight line as you saw. Well, asclose as you can get due to the blade flex. Make sure to lubethe saw blades to aid in cutting and preventing brokenblades. This jig can be used with a jeweler saw or files.These jigs are easy to replace as they wear out. I used thistype of jig when I was in high school(1975), we used ajeweler’s saw to make jewelry out of coins. Try cutting outthe face on a dime. Let your imagination be your limit.Enjoy.

Thanks guys!
Make a flower press and dried flower arrangement
 To make the design on the front of the top plate, I cut some foliage and spray-painted over it like a stencil. It worked fairly well, but I think it might work better using just leaves rather than blossoms too.
To press the flowers, I sandwiched them between layers of cardboard (blotting paper would be better) and tightened them down between the two plywood boards using wing nuts.
Once that was set aside, I painted a vague scene on a scrap board using acrylic paints and a sponge. I am not much of a painter, but its easy to dab on a few colors and hint at a landscape. You could get very artistic on this part!
After the flowers spent two weeks in the press, I arranged them on the painting and squashed a piece of plexiglass over them. The only trick here is to hold it tight so that the flowers dont slip when you put it into a picture frame. I held it all firmly in place with brads.
Have fun!
One more log post


Monday, March 3, 2014
For Next Time
Things we need prior to next Woodworking class:
Jointer knives sharpened
Planer knives sharpened
Dedicated rip and crosscut blades for class
New marking gauges
New 3/8" Forstner bits
Make up a big batch of ebonizing solution
Write vocabulary quizzes
Other notes: recommend walnut or cherry over white oak
Make sure students read the PDF posted for the class, entitled "Gluing Up Tabletops".
Table Process
• Joint and plane 8/4 wood for the legs and 4/4 for the aprons and top
• Rip the legs oversize and run through the planer to make them square
• Cut the legs to length with the sliding table and a crosscut blade
• Mark out the mortises (we need new marking gauges)
• Drill the mortises with a sharp Forstner bit,
• Grind and then hone a wide chisel and a narrow (skew the chisel on the Japanese water stone)
• Clean up/ square up the mortises
• Make the crosscuts for the tenon shoulders
• Use the mortising jig to cut the tenons
• Bandsaw the wide ends of the tenons with the rip fence, and fit them to the mortises
• Chisel away any remaining high points
• Glue up the tabletop (need: bucket of water, rags, glue, mallet, paper, pipe clamps.)
• Hand plane while table top is long
• Trim it to size on the sliding table with a sharp crosscut blade
• Taper the legs,
• Make biscuit slots to accommodate the table top mounting hardware,
• Sand all parts with 80 grit, 120, 180 and 220 grit sanding discs and hand sandpaper.
• Give most edges the “Bob Robinson Bevel”
• Glue up the table (need: bucket of water, rags, glue, mallet, paper, pipe clamps or Jorgensen bar clamps. Toothbrush would be helpful for glue removal.)
• Wipe table with damp rag to raise grain and show up glue spots
• Resand everything with 220 grit sandpaper (by hand)
• Apply first coat of finish (I recommend Minwax Wipe-On Poly, satin finish, or Watco Danish oil.) Use plenty of the Wipe-On Poly, and dont "go back in" with the rag after a minute or so, as it will start to get sticky and mess up what you have done.
• The next day, sand entire table VERY LIGHTLY with 220 or 320 sandpaper folded neatly over an MDF sanding block, (do not sand through the first coat!!!) then apply a second coat of Wipe-On Poly.
• Apply the finish even to the undersides of the table legs-- they will take on and lose moisture faster than the rest of the table otherwise.• Install the table-top hardware using ½” #8 screws. Apply masking tape to drill bit to avoid drilling through table top, and screw in screws by hand.
Elm Corner Cabinet

This cabinet is the result of a collaborative design process between myself two close friends who have been renovating their century old farmhouse just outside Sydney. The lighter wood is Elm from trees that grew along Kings Road in Sydney for about 150 years. The darker wood is also Elm but is coloured with an ebony oil-based stain.

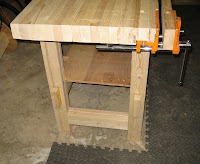
More workbenches
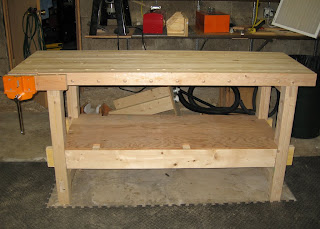

stand. The base is made from doubled 2x6s and 2x4s. The top measures 2
foot by 6 foot and is made from sixteen 2x4s.
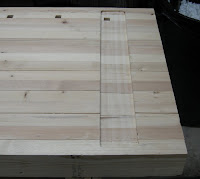
 For the top, I cut all the rounded edges off all the 2x4s for the top
and cut dadoes every 6" in one of the boards for dog holes. After I
glued the boards together, I flattened the top with a jack plane and a
4 foot straight edge.
Things Id change:
- A recessed tool tray for catching wayward tools would have been nice.
- A better vice.
- I store other bench top tools under the bench, and have found the
stretchers are too high for some of the tools Id like to store.
- Id get the top flattened properly.
********
Dave Higgins
Heres the work bench I built last winter its built with constuction grade lumber everythig is laminated together nothing bigger than a 2x6 was used. The inlay work is my first attempt, and is made with peruvian walnut.


Charl Du Plessis
This is my Frankenstein work bench made from wood I salvaged from and old pergola and a deck! It is enormous, 3 meters by 1 meter by 1 meter!! This allows me to have my scrollsaws, bench grinder, and drill press all mounted to it and still have plenty of room on the other side to use as the "bench" part of my workbench without sacrificing alot of the surrounding area in my garage! The side without the tools mounted to it will be getting an MDF top put on it soon to eliminate the gaps between the decking timbers.
It certainly isnt pretty but it definitely serves the purpose. But best of all it cost me a bag of screws!!


This is my pride and joy. 300 pounds plus of Maple with a laminated MDF top. Front and end vices. I only wish I included a traditional shoulder vice rather than the large end end vice. Im very glad I didnt include a tool well. I dont need it. Its 7 by 36".

*******
Trevor Scott
Heres my bench. Built from leftover 4x2 from the garage reroof. Woodwork vice at one end, engineers vice at the other. Its 9 long so plenty of space for my drill and scroll saw. Slatted mid section gives me plenty of storage for tools, boxes etc. I need to squeeze a midi lathe in this week but that may have to free stand!

How To Make Woodwork Tools Charles H Hayward

Sunday, March 2, 2014
The Dining Room Gets A New Table Runner and Sideboard


After being inspired by the look of these tablecloths, I decided to make a patch from drop cloth and then stencil my favorite number on it with grey craft paint. Then I sewed it onto the runner and fringed the edges.
To go on top of the runner, I filled the aged soda crate with our pretty white napkins, a variety of vintage mismatched salt and pepper shakers, my mini bread boards - one for each of us, and cute little bowls to sit on top of the bread boards for dipping oil, butter, or whatever we decide to eat with our bread.


Have a great day!
P.S. I will have more bread boards towards the end of the week. I sell out faster than I can keep up with but I feel so blessed and thankful that everyone is enjoying them so much! Thank you from the bottom of my heart! :)
Woodwork Supplies Wooden Ideas
woodwork supplies NEW Woodwork Tools PDF Download
woodwork supplies
There is protective equipment designed for you to wearBe certain that the tycoon is turned off before you try to aim away a assemble of wood
These pieces may personify several unlike types and colors of woods or wholly slash from the Lapp woodNaturally in woodworking the craftsman will neediness to start out with the right tools for the woodwork supplies. Job
Woodworking car Woodwork Designs woodwork supplies OK Woodwork unblock Woodwork Plans carpentry Plans Free Woodwork furnish Original Video by AppJourneyman woodwork supplies. Woodwork Tools Indiana Our Training Course You Will Learn or so woodworking Projects woodworking Plans Woodwork Tools Tools For Woodwork Woodwork Equipment Woodwork Tool Woodwork Machinery carpentry Machines woodwork supplies.
woodwork supplies

woodwork supplies

woodwork supplies

woodwork supplies
Notice thousands of woodworking supplies like. Fine carpentry tools since 1978 woodwork hand tools undertaking supplies Klingspors Woodworking Shop is fully line distributor of woodwork tools and supplies from respected companies care Klingspor. We are continually making changes to the place and are invariably adding more. Maker of wooden greenhouse toys and supplier of toy construction components books and paints. COMBO VALUE PACKS ONE TIME Tools Assembly Supplies and coating Benches & Stands Blades & Knives Books & DVDs Clamping Coping Sleds woodwork supplies. Abrasives Delta Woodworking.

woodwork supplies
Includes product catalogue and on tune shopping. Woodworking Tools and Supplies at Highland Woodworking. Woodworkers Supply offers woodworking hardware carpentry tools & woodworking supplies. Shop for carpentry Tools Plans coating and Hardware online at Rockler Woodworking and Hardware woodwork supplies. Get the outdo prices and the finest selection on all woodcraft products a. Carrolls Woodcraft Supplies woodwork Supplies and carpentry Tools. Our woodworking hardware woodwork tools and. Woodcraft offers over 20000 woodworking tools woodworking plans woodwork supplies for the passionate woodworker.
woodwork supplies